Kombucha : home-made
15 Sep 2017
It’s finally summer and there’s every reason to cool off. The kombucha drink becomes particularly popular in the warmer months and you may want to brew your own for the pleasure of flavoring your own kombucha.
After turning my kitchen into a domestic kombucha manufacturing factory, I share with you my tips and tricks for making a successful drink. I hope you enjoy brewing this delicious, very refreshing and probiotic-filled drink. The technique may seem a little daunting at first, but making kombucha will quickly prove to be a source of real pleasure!
But first, what is kombucha?
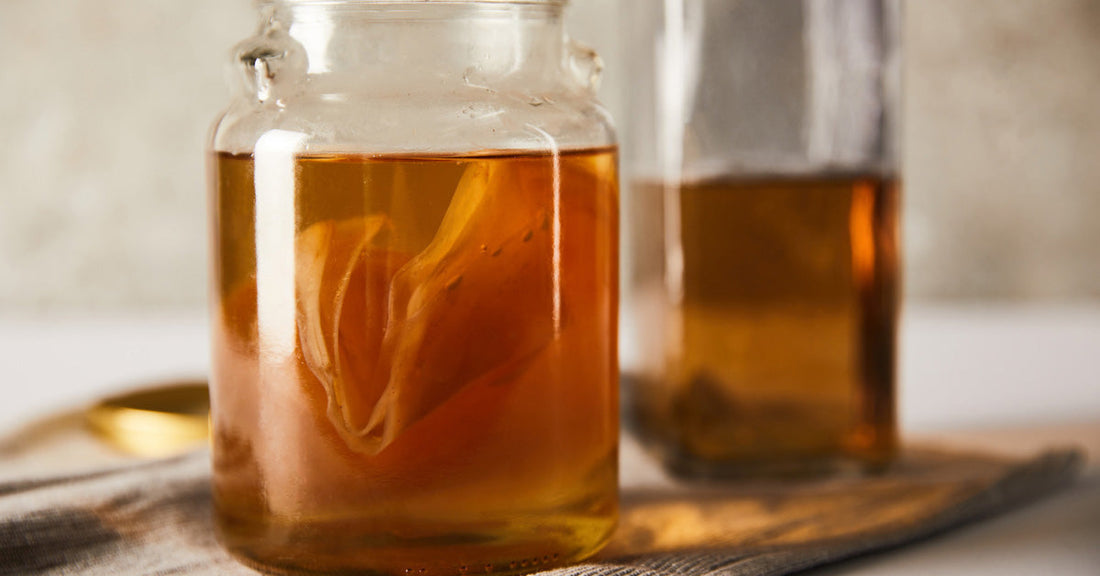
Kombucha is a naturally carbonized beverage resulting from the fermentation of a symbiotic culture between bacteria and yeast (scoby or mother). The finished product is lightly refreshing, energizing and packed with probiotics.
The mother is the most important element of the process, it is the basis of fermentation. It is somewhat finicky and must be handled with care, kept away from direct light. The mother contains a multitude of organisms
alive and should therefore also not be stored in a dark place.
Regardless, always handle the mother with clean, soap-free hands to avoid harming her bacterial integrity and ensure that surfaces she may come into contact with are free of soap and detergents.
Brew the kombucha
To brew your tea, you will need the following equipment:
-
A scoby; also called the mother (available at La Boite à Grains)
-
A filter (either a coffee filter or a thin cloth like a light washcloth) as well as an elastic band
-
1 cup cane or coconut sugar
-
8 sachets de green tea, preferably organic
-
3 ½ liters of pure filtered water (It is imperative that the water used is free of chlorine. Chlorine can harm the growth of your kombucha culture. Spring, well, or distilled water are good options.)
-
Large glass jars washed, rinsed and free of soap residue
How to do this?
Once you get your hands on a mother, store it in its liquid away from light and direct heat until you are ready to begin kombucha production.
1ier fermentation
- Bring the water to a boil in a large soup bowl then remove from the heat.
- Add the sugar and stir until the crystals are completely dissolved.
- Add tea bags then let cool. (This can take several hours, which is why I often make the infusion at bedtime)
- When the infusion has cooled, add the mother and its liquid.
- Carefully pour the entire contents into a very large glass jar with a wide opening.
- Place your filter over the opening of the container and secure it with a stiff elastic band. This prevents contamination with other organisms while keeping fruit flies well away.
- Let everything ferment on your kitchen counter for 10 to 14 days. You can taste the liquid using a straw, while avoiding poking the mother, to determine if the balance between sugar and acidity is achieved. A drink that is too sweet may be fermented for longer, and a vinegary drink has been fermented too long.
2th fermentation This fermentation aims to flavor and carbonize your kombucha.
- Prepare an infusion of sweet tea as during the first fermentation then leave to cool. This will be used to prepare a next batch.
- With clean hands but without soap, carefully remove the mother from its fermentation jar and place it on a clean, rinsed plate without detergent residue.
- Store 2 cups of your fermentation in a clean, rinsed, detergent-free glass jar.
- Bottle your fermented kombucha in individual jars by pouring it using a funnel. The bottles can be glass (Mason jar type) or plastic.
- Flavor each bottle of kombucha with an ingredient of your choice: a few milliliters of fruit juice, a few drops of chlorophyll, a few blueberries or pieces of strawberries, a piece of ginger, a handful of bee pollen, fresh herbs, etc.
- Close the lid of each bottle and let the second fermentation sit on your counter for 2 to 3 days.
- Finally, place the bottles of fermented and flavored kombucha in the refrigerator to stop fermentation. Consume within the following month.
Start again
Place your scoby as well as the two cups of reserved liquids in the infusion prepared at point 1 (of the 2nd fermentation) in order to restart fermentation and maintain continuous production.
The division
A healthy mother will produce babies quickly. By having multiple scobys, you will have greater kombucha production. Babies are formed when the mother is mature. You can see part of the mother coming off or a new scoby forming at the bottom or top of the jar. Once fully rounded and well formed, the baby can be separated from its mother and participate in its own fermentations.
The formation of a thick residue at the bottom of the fermentation jar can also be used to form a mother. You simply have to keep the residue and offer it a sweet infusion, in the same way as a scoby, then you will see a mother forming.
Conservation
Your production may be so successful that many babies may be formed. Don't throw them away. Instead, store them in a hotel following the following instructions:
-
Prepare a sweet infusion
-
Place your extra scobys into the cooled brew and close the lid tightly
-
Store everything at room temperature or in the refrigerator until you find takers.
Some advice from friends
Choice of sugar: It is good to favor fermentation with cane sugar. This is what, in general, offers better fermentations while preserving the health of the scoby. However, from time to time, fermentation with coconut sugar can revive the mother kombucha and increase production.
Changement d’apparence : It is normal for the mother to float on the top, bottom or side of the fermentation jar. It is also normal for brownish chains to form below the scoby. If your scoby develops a hole, bumps, dry patches, dark brown spots, or clear jelly-like spots, he is still healthy. These changes usually reflect small adjustments to the surrounding environment.
End of life: If the scoby turns black, this is a sign that it has reached its maximum lifespan and it will need to be thrown away. If the mother develops black or green mold, it should also be discarded.
Other fermentations: If you are a fan of fermentation and you ferment other products in your kitchen, it is best to keep a distance between the different cultures, in order to avoid cross-contamination, which could negatively affect your production.
About the author
Naturopaths from La Boite à Grains
Team of qualified and certified naturopaths (ND) in Gatineau in Outaouais.
Original article written by Véronique Cousineau, Naturopath
Tags :